To screen record on Mac, press Shift-Command-5, choose Record Entire Screen or Record Selected Portion, pick a microphone under Options if you want to narrate, and click Record. Stop with the Stop button in the menu bar or Command-Control-Esc. The video saves to your desktop as a .mov file. Nothing to install: the Screenshot app is part of macOS. What differs by version is what it can capture: recording a single window needs macOS Tahoe 26, and recording the Mac’s own sound needs macOS 27 Golden Gate. This guide covers both built-in routes, audio on every recent version, the stop shortcut, permissions, and editing the result.
Key takeaways
- Shift-Command-5 opens the recorder. QuickTime Player’s File → New Screen Recording opens the same controls on current macOS.
- Microphone and system audio are separate. A microphone records your voice; app and video sound needs Include System Audio, which Apple added in macOS 27. On macOS 13 to 26, use OBS Studio for system audio.
- Stop with the menu-bar button or Command-Control-Esc. Files are named “Screen Recording [date] at [time].mov”.
- Nothing recorded, or no sound? It’s almost always a permission in System Settings → Privacy & Security.
- To pick a different recorder entirely, see our screen recording software guide. On a PC, read how to screen record on Windows.
How to screen record on Mac with Shift-Command-5
Apple’s screen recording guide describes the same sequence on every current version of macOS:
- Press Shift-Command-5. The Screenshot toolbar appears at the bottom of the screen. The first three buttons take still screenshots; the recording buttons come after them.
- Choose what to record.
- Record Entire Screen captures everything on one display.
- Record Selected Portion shows a frame. Drag its edges to resize it, or drag inside it to move it.
- Record Selected Window captures one app window, and is available in macOS Tahoe 26 or later.
- Click Options and set the recording up (details below).
- Click Record. If you chose a window, click the window you want instead.
- Stop with the Stop button in the menu bar, or press Command-Control-Esc.
To cancel before you start, press Esc. If you prefer the keyboard-free route, you can also open Screenshot from Spotlight, as Apple’s Screenshot guide notes.
Set the options before you press Record
The Options menu decides most of what ends up in the file, so check it once before an important recording. The Screenshot guide lists these settings:
- Save to. Desktop by default. Choose another preset location, or Other Location to send recordings to a project folder.
- Timer. A short delay before recording starts gives you time to close the toolbar and put the cursor where the action starts.
- Microphone. Choose your built-in or external mic to narrate. None records silence.
- Include System Audio (macOS 27 or later). Records the sound your apps play.
- Show Floating Thumbnail. Leave it on if you want to trim right after recording.
- Remember Last Selection. Keeps the same frame for the next take, useful when you record a series of steps.
- Show Mouse Clicks. Draws a black circle around the pointer on each click, which makes tutorials easier to follow.
- Capture Format. On supported Macs running macOS Tahoe 26 or later, choose SDR (Most Compatible) for H.264 video or HDR for HEVC. Pick SDR unless you know your viewers watch on HDR displays.
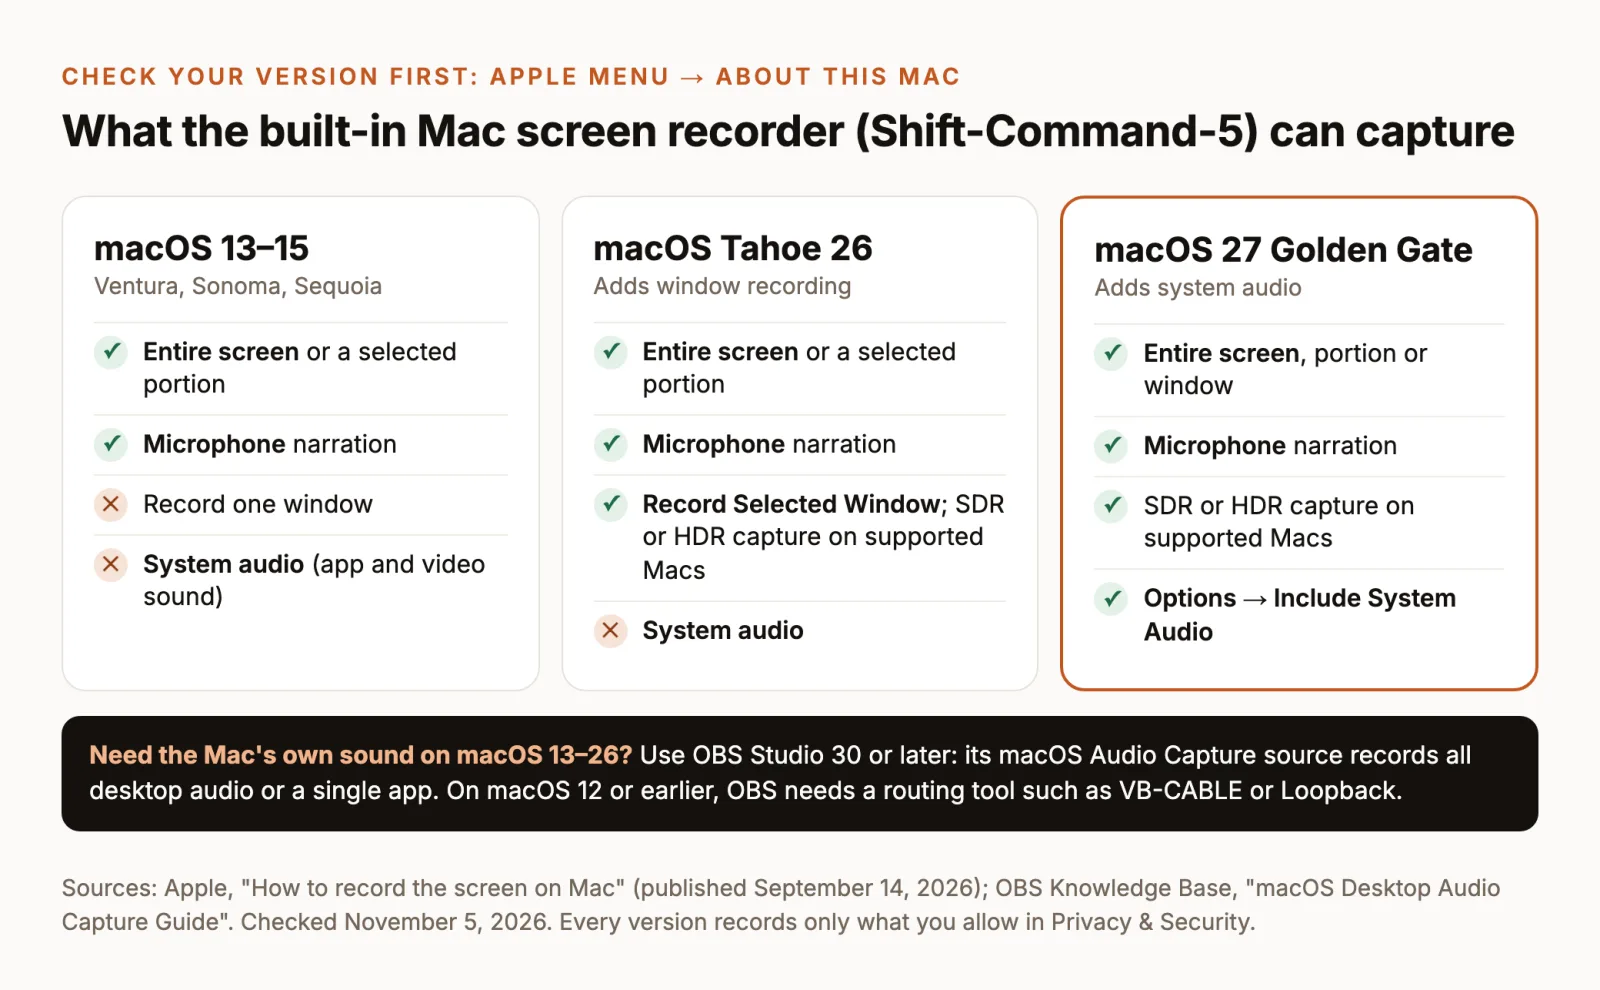
Not sure which version you have? Choose Apple menu → About This Mac; the window shows the macOS name and number (Apple).
Record your screen with QuickTime Player
QuickTime Player is the older route, and on current macOS it hands you to the same tools:
- Open QuickTime Player from your Applications folder.
- Choose File → New Screen Recording, or press Control-Command-N.
- If the Screenshot toolbar appears, follow the steps above. Apple’s QuickTime guide describes this as the normal behavior.
- If a separate Screen Recording window appears instead, your Mac uses QuickTime’s own recorder. Click the arrow next to Record to choose a microphone and Show Mouse Clicks in Recording, then click Record. Click anywhere to record the whole screen, or drag to select an area and click Start Recording inside it.
The one reason to start from QuickTime is the editing that follows: after you stop, QuickTime Player opens the recording so you can play it, trim it and choose File → Save to name it and pick a folder. Depending on the Save to location you choose in Options, an app such as QuickTime Player may open the recording for you.
How to screen record on Mac with audio
Most “no sound” complaints come from mixing up two different sources. Decide which one you need before you record.
Record your voice with a microphone
In Screenshot’s Options, choose a microphone so a checkmark appears next to it. A USB or headset mic sounds closer and picks up less fan and keyboard noise than the built-in one. If you use speakers while narrating, your mic can pick up playback sound faintly, which is not the same as recording system audio; Apple suggests headphones when you hear feedback.
Record system audio on macOS 27 or later
On macOS 27 Golden Gate or later, open Options and choose Include System Audio. You can select it together with a microphone to record a narrated walkthrough of an app or video that plays sound. Apple documents this option only from macOS 27 (Apple); you won’t find it in the menu on earlier versions.
Record system audio on macOS 13 to 26
Earlier versions of the built-in recorder capture a microphone only. The free route is OBS Studio:
- OBS 30 or later on macOS 13 or later: add a macOS Audio Capture source to record all desktop audio or one app. The macOS Screen Capture source also captures audio (OBS Knowledge Base).
- OBS 28 or 29: use the macOS Screen Capture source; its audio appears in the Audio Mixer.
- macOS 12 or earlier: OBS needs a separate routing tool such as VB-CABLE or Loopback.
OBS needs Screen & System Audio Recording permission (see the fixes below). Record a 10-second test, play it back and watch the mixer meters before the real take. If you’d rather not set up OBS, our screen recording software guide compares recorders that document system-audio capture.
How to stop screen recording on Mac and find the file
There are two ways to stop:
- Click the Stop button (a square in a circle) in the menu bar.
- Press Command-Control-Esc.
If the menu bar is hidden, for example in a full-screen app, the keyboard shortcut is the reliable option. When you stop, a thumbnail appears in the bottom-right corner for a few seconds.
Where screen recordings go on a Mac: to the desktop, unless you changed Options → Save to. The file is named “Screen Recording [date] at [time].mov” (Apple). If it’s not on the desktop, open Options again: the checked location is where it went. Spotlight search for “Screen Recording” also finds it.
Trim it right away: click the floating thumbnail to open a window where you can trim the start and end of the recording or share it. For a recording already saved, open it in QuickTime Player, choose Edit → Trim, drag the yellow handles and click Trim (QuickTime trim guide).
Trimming cuts the ends only. To remove a mistake in the middle, zoom into the control you’re explaining or add captions, you need an editor.
Fix screen recording problems on Mac
Work through these in order; each is a separate cause.
The recording shows only the wallpaper or a blank window
The app doing the recording lacks screen permission. Open Apple menu → System Settings → Privacy & Security → Screen & System Audio Recording and turn the app on (Apple). On macOS Ventura the item is called Screen Recording (Apple, Ventura guide), and the Privacy & Security overview explains the other switches on that page. Quit and reopen the app afterward. Third-party recorders such as OBS, browsers, meeting apps and ChatCut each need their own switch.
The video has no sound
- Check Options → Microphone isn’t set to None.
- If you wanted app sound, check that you chose Include System Audio (macOS 27 or later) or set up OBS on earlier versions.
- For third-party recorders, quit the app, open System Settings → Privacy & Security → Microphone, turn the app on, reopen it and record again (Apple).
- For an external mic or audio interface that still fails, check with its manufacturer for driver updates.
One app’s window records as black or can’t be selected
Some apps block recording. Apple names the Apple TV app as an example (Apple). Changing permissions won’t override an app that blocks capture, so record a different source or ask the content owner for a file.
Shift-Command-5 does nothing
The shortcut can be changed or turned off. Check System Settings → Keyboard → Keyboard Shortcuts → Screenshots and restore it, or open Screenshot from Spotlight or QuickTime Player’s File menu instead.
The file is too large or looks blurry
Recording a 5K or Retina display at full size makes large files. Record a selected portion around the app window instead of the whole screen, and choose SDR if your Mac offers a capture format. Small text stays readable when the recorded area is close to the size viewers will watch at.
Edit the recording in ChatCut Desktop
A raw screen recording usually has a slow start, a wrong click or two and text that’s too small to read on a phone. ChatCut Desktop runs on macOS 13 or later, on Apple silicon or Intel, and edits the .mov file where it sits on your disk.
Import the recording and cut the dead time
- Open a project, select My Assets, click Upload and choose Files…, or drag the recording in from Finder. Desktop reads the file from its original location, so long recordings don’t need to upload before you start.
- Wait for transcription to finish if you narrated. In the Transcript panel, deleting words cuts that time range from the video, so you can remove a stumble by selecting it like text (captions and transcript docs).
- Or ask the Agent in the AI panel. Paste this prompt with the recording selected:
Check the result by watching each cut: a removed loading screen is fine, a removed click is not. If your narration has filler words and long pauses, the Speech Cleanup Skill runs that pass on its own.
Zoom in on the control you’re explaining
Open Library → Zoom and drag a Zoom onto the clip, then adjust its strength and duration. Or ask the Agent, naming the moment:
Name the time range and what should fill the frame; “add zooms” alone leaves the Agent guessing which controls matter. For deciding where zooms and callouts belong in a demo, see how to make a product demo video.
Add captions to your narration
Turn on captions with the split Captions control in the playback controls and pick a style from its chevron, such as Plain, Netflix or TikTok Pop. Captions follow your transcript; use the caption track’s Content panel to search and replace a misheard product name across every card.
Export, or skip the separate recorder next time
Choose Export → Video, pick a resolution up to 4K and a frame rate, and choose where to save. Desktop renders on your Mac, so keep it open until the export finishes (local export docs). Export → Subtitles saves an .srt file once transcription is done.
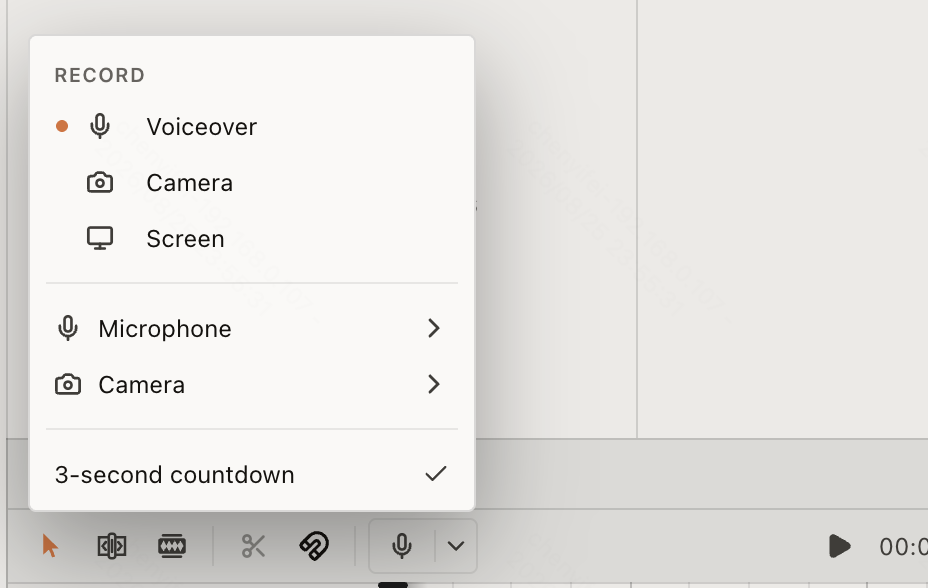
You can also record straight into a project: the Record control in the Timeline has a Screen mode that opens the system screen or window picker and drops the take at the playhead (recording docs). ChatCut needs the same Screen & System Audio Recording permission described above.
Manual editing, uploads, transcription and export don’t use credits. Requests to the built-in Agent, including Skills, use credits based on the work done.
When to use a different recorder
The built-in recorder covers quick clips, tutorials and bug reports. Look elsewhere when you need a webcam bubble, automatic zoom while recording, a shareable link the moment you stop, or system audio on macOS 26 or earlier without OBS. Our screen recording software guide compares those apps by use case and price.