To screen record on Windows 11, press Windows + Shift + R, drag over the area you want, turn on the microphone or PC audio if you need sound, and select Start. Select Stop when you’re done; Snipping Tool saves the video to Videos\Screen Recordings. On Windows 10, Snipping Tool can’t record video, so open the app you want to capture and press Windows + Alt + R to record it with Xbox Game Bar; the MP4 lands in Videos\Captures. Both are free and built in. This guide covers those two routes plus Clipchamp and PowerPoint, audio on each, where files go, common fixes, and how to edit the result.
Key takeaways
- Windows 11: Snipping Tool, Win+Shift+R. Records any part of the screen, including the desktop, with separate microphone and PC audio toggles.
- Windows 10 (and 11): Xbox Game Bar, Win+Alt+R. Records one app or game, not the desktop or File Explorer.
- Need a webcam too? Clipchamp records screen and camera for free. Already have desktop PowerPoint? Insert → Screen Recording works on any version that has it.
- No sound? Check the tool’s own audio toggles first, then Settings → Privacy & security → Microphone.
- Choosing a dedicated recorder instead is a different question; our screen recording software guide answers it. On a Mac, read how to screen record on Mac.
Choose your Windows recording method
Which built-in tool you can use depends first on your Windows version and second on what you need to capture. To check your version, right-click Start, choose Settings → System → About (Microsoft).
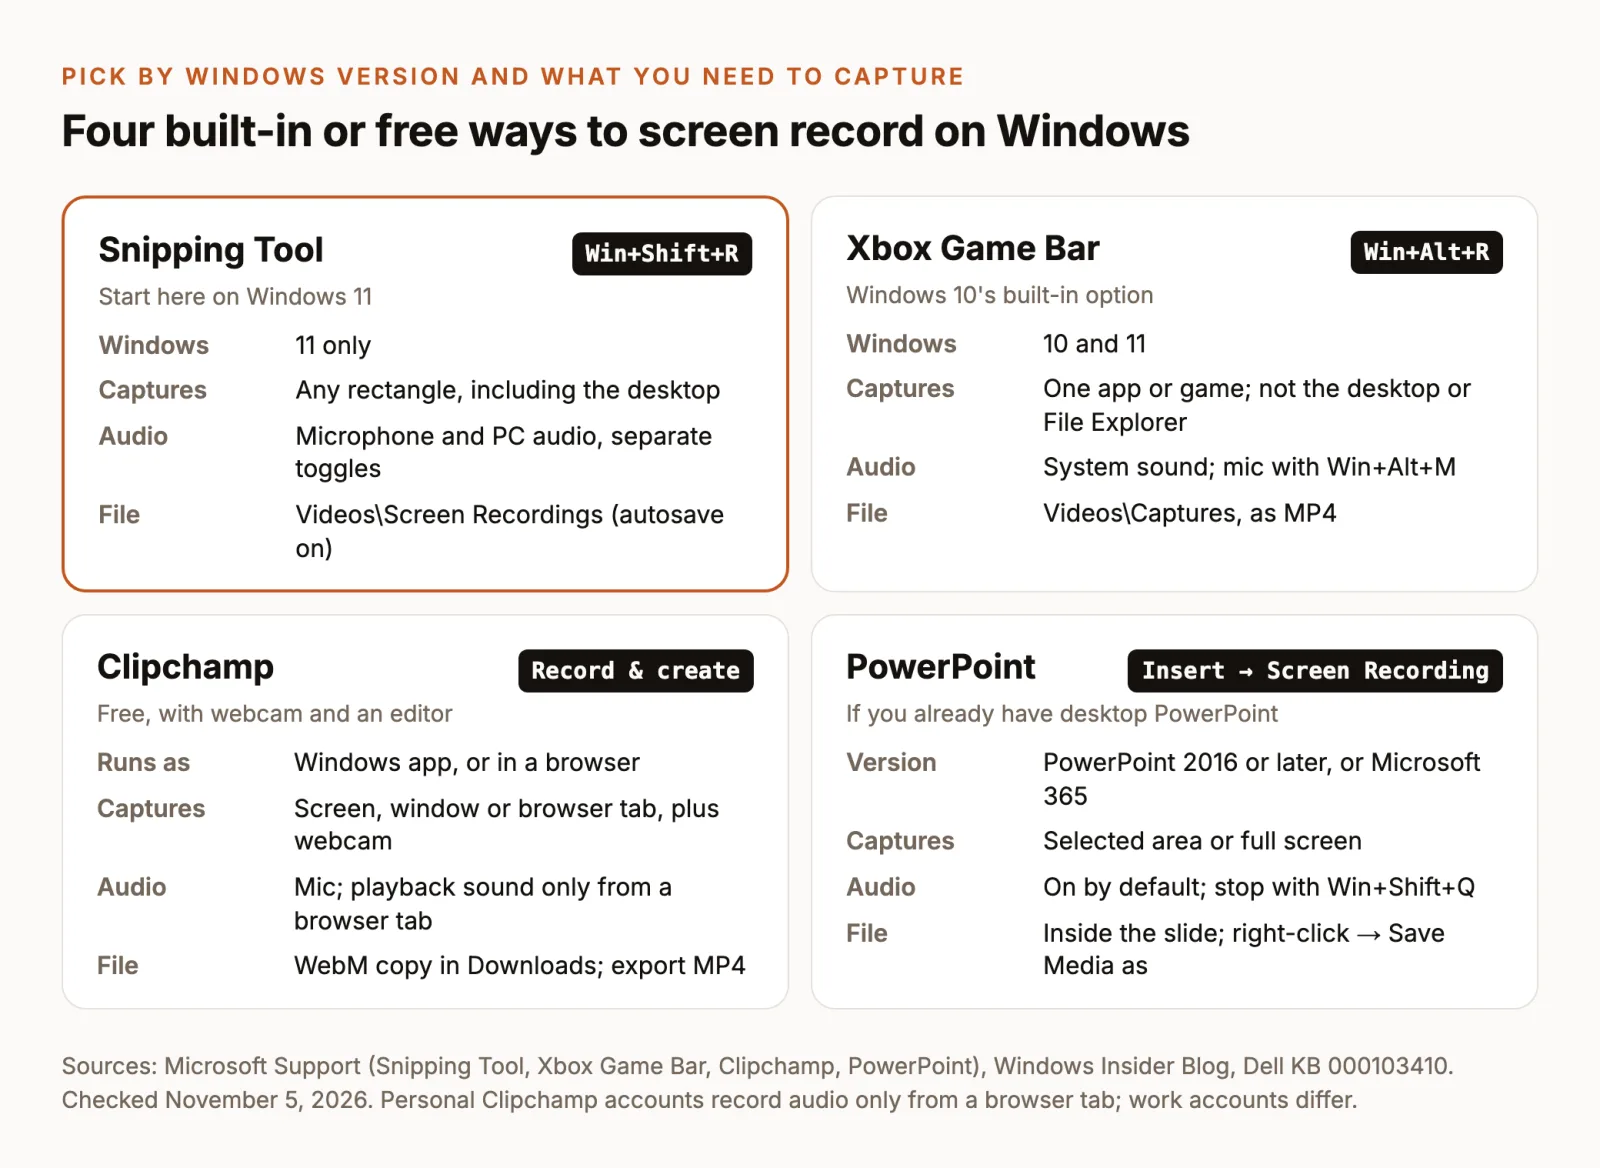
In short: on Windows 11, start with Snipping Tool for almost everything. On Windows 10, use Game Bar for a single app, and Clipchamp or PowerPoint when you need the desktop, several windows or a webcam.
How to screen record on Windows 11 with Snipping Tool
Microsoft’s Snipping Tool guide gives the steps:
- Press Windows + Shift + R. The Snipping Tool overlay opens, ready to record video. Or open Snipping Tool, select Record, then New.
- Drag over the area to record. Draw the rectangle tightly around the app if viewers will watch on a phone; a smaller area keeps text readable.
- Set the audio on the capture bar (see below).
- Select Start to begin recording.
- Select Stop on the capture bar when you’re finished.
Snipping Tool is included with Windows 11 at no extra cost, with nothing to install or sign in to (Microsoft). It records only a rectangle you draw; to capture the full screen, drag the selection across the whole display.
Turn on the microphone and PC audio
Snipping Tool has two separate audio sources. The microphone records your voice for a voiceover. PC audio (system audio) records what your apps play, such as a notification sound or a video you’re demonstrating. Microsoft added both in Snipping Tool version 11.2307.44.0, along with settings for the default audio of new recordings and a picker for your preferred recording device (Windows Insider Blog).
Check both toggles on the capture bar before you select Start. If you narrate over loud app audio, your voice can get buried; lower the app’s volume rather than the microphone. If you see no audio toggles, update Snipping Tool: audio recording arrived in that version.
Stop, preview and save the recording
After Stop, the recording opens in Snipping Tool for preview. With automatic save turned on, it is already saved to the Screen Recordings folder inside your Videos folder (Windows Insider Blog). You can turn automatic saving off in Snipping Tool’s settings. To keep another copy elsewhere, select Save as and pick a folder and name. Edit in Clipchamp opens the video in Microsoft’s editor for trimming or captions (Microsoft).
Record on Windows 10 or 11 with Xbox Game Bar
Game Bar is built for game clips, but it records most apps, which makes it the default free recorder on Windows 10. Its limits matter before you start: according to Dell’s support article, it does not open on the desktop and does not work in apps such as File Explorer or Notepad, and not every app is compatible. Start it from inside the app you want to show, and keep the demo within that app.
Turn Game Bar on
Press Windows + I to open Settings, search for xbox, choose Enable Xbox Game Bar and turn it on (Microsoft).
Record an app
- Open the app or game you want to record and click inside it so it’s the active window.
- Press Windows + Alt + R to start recording.
- Press Windows + Alt + M to turn the microphone on or off during the recording.
- Press Windows + Alt + R again to stop.
Press Windows + G at any time to show the Game Bar controls if you prefer clicking.
Include system sound and your voice
Open Game Bar with Windows + G, choose Settings → Capturing, and select All under the audio to record, so the clip includes all system sounds and not only the game (Microsoft). The microphone is a separate switch: toggle it with Windows + Alt + M or in the Capture widget.
Game Bar saves each clip as an MP4 in Videos\Captures, named after the app plus the date and time. Dell also notes that the mouse pointer may not be visible in playback, which matters for tutorials, so record a 10-second test and play it back before a long session.
Use Clipchamp or PowerPoint instead
Both are useful on Windows 10, where Snipping Tool can’t record video, and when you need something the built-in tools don’t do.
Record screen and webcam in Clipchamp
Clipchamp is Microsoft’s video editor. It runs as a Windows app or in the browser, and its screen recorder is free:
- In the editor, open the Record & create tab and choose Screen or Screen & camera.
- Allow camera and microphone access the first time, then pick your microphone.
- Click the red record button and choose a browser tab, window or entire screen, then select Share.
- Select Stop sharing when you’re done, preview the take, and choose Save and edit (or Retake recording).
The audio rule is the catch: in personal accounts, playback sound is recorded only when you share a browser tab and turn on its audio-sharing toggle. Recording a window or the whole screen captures your microphone only. In the Windows app, the tab picker lists Microsoft Edge tabs. Clipchamp states a 30-minute limit on recordings with audio (Clipchamp); the maximum also appears next to the timer while you record. A WebM copy of each recording downloads to your Downloads folder or a folder you choose, and Export saves the edited video as MP4. Work and school accounts differ: they let you include system audio when you pick a screen, window or tab.
Record a clip in PowerPoint
Desktop PowerPoint (2016 and later, and Microsoft 365) has a screen recorder made for inserting demos into slides (Microsoft):
- Open a slide and choose Insert → Screen Recording.
- On the Control Dock, choose Select Area (or Windows + Shift + E) and drag over the area. Windows + Shift + B selects the full screen.
- Audio and Record Pointer are on by default; turn them off on the dock if you don’t want them.
- Select Record. Windows + Shift + D pauses; Windows + Shift + Q stops.
- The video is inserted into the slide. To keep it as a file, right-click it, choose Save Media as, and pick a folder.
The pause shortcut helps when you record a long procedure in parts.
Where screen recordings are saved on Windows
- Snipping Tool: Videos\Screen Recordings, when automatic save is on. Otherwise only where you chose with Save as.
- Xbox Game Bar: Videos\Captures, as MP4.
- Clipchamp: a WebM copy in Downloads (or your chosen folder), plus the MP4 you export.
- PowerPoint: inside the presentation until you use Save Media as.
If a file is missing, search File Explorer for the time you recorded, or open the tool you used and check its settings for the save location.
Fix screen recording problems on Windows
Windows + Shift + R does nothing
That shortcut records video only in Windows 11’s Snipping Tool; the Windows 10 version takes screenshots only. On Windows 11, open Snipping Tool and look for the Record button. If it’s missing, update Snipping Tool and Windows, then try again.
Windows + Alt + R doesn’t start recording
Work through three checks:
- Game Bar is turned on (Settings, search xbox, Enable Xbox Game Bar).
- The app you want is the active window. Game Bar won’t record the desktop or File Explorer, and some apps aren’t compatible (Dell).
- The shortcut hasn’t been changed. Game Bar’s settings let you reassign its shortcuts, as ZDNET’s walkthrough shows, so check the list there.
If the app still won’t record, use Clipchamp, PowerPoint or a dedicated recorder instead.
The recording has no voice
Check the tool’s microphone toggle first. If it’s on and the track is still silent, open Windows’ privacy settings (Microsoft):
- Windows 11: Start → Settings → Privacy & security → Microphone. Turn on Microphone access and Let apps access your microphone, turn on the app you’re using, and for desktop apps turn on Let desktop apps access your microphone.
- Windows 10: Start → Settings → Privacy → Microphone. Turn on Microphone access for this device, then Allow desktop apps to access your microphone.
Then confirm the tool is using the microphone you expect, especially after plugging in a headset.
The recording has my voice but no app sound
That’s a different source. In Snipping Tool, turn on the PC audio toggle. In Game Bar, set Settings → Capturing to All. In Clipchamp’s personal version, only a shared browser tab carries playback audio.
The recording stopped early
Clipchamp stops at its maximum recording time; record in parts and join them in the editor. Game Bar also has a maximum recording length, set under Settings → Gaming → Captures according to the same ZDNET walkthrough; raise it before a long session.
Edit the recording in ChatCut Desktop
A raw recording usually has a slow start, a wrong click and small text. ChatCut Desktop runs on Windows 10 or later (x64) and edits your MP4 or WebM where it sits on your drive.
Import the recording and cut the dead time
- Install Desktop (the Desktop docs give the one-line PowerShell command), open a project, select My Assets → Upload → Files…, or drag the file in from File Explorer.
- If you narrated, wait for transcription. In the Transcript panel, deleting words removes that time range from the video, so a stumble comes out like a typo.
- Or ask the Agent in the AI panel with the recording selected:
Watch each cut before moving on: a removed loading spinner is fine, a removed click is not. For narration with many “ums” and long pauses, the Speech Cleanup Skill handles that pass, and our guide to removing silence and filler words covers the settings.
Zoom in on the control you’re explaining
Open Library → Zoom and drag a Zoom onto the clip, then adjust its strength and duration. Or name the moment for the Agent:
Add captions to your narration
Turn captions on with the split Captions control in the playback controls and choose a style from its chevron. Use the caption track’s Content panel to search and replace a misheard product name across every card.
Export the finished video
Choose Export → Video, pick a resolution up to 4K, a frame rate and a destination, and keep Desktop open while it renders on your PC (local export docs). Export → Subtitles saves an .srt file once transcription is done.
You can also skip the separate recorder: the Timeline’s Record control has a Screen mode that opens the system screen or window picker and places the take at the playhead (recording docs).
Manual editing, uploads, transcription and export don’t use credits. Requests to the built-in Agent, including Skills, use credits based on the work done.
When to use a different recorder
Snipping Tool and Game Bar cover quick clips, bug reports and short tutorials. Look at a dedicated recorder when you need long multi-source recordings, streaming, a webcam overlay without Clipchamp, GIF output or a shareable link the moment you stop. Our screen recording software guide compares OBS Studio, ShareX, Camtasia and others by use case and price.