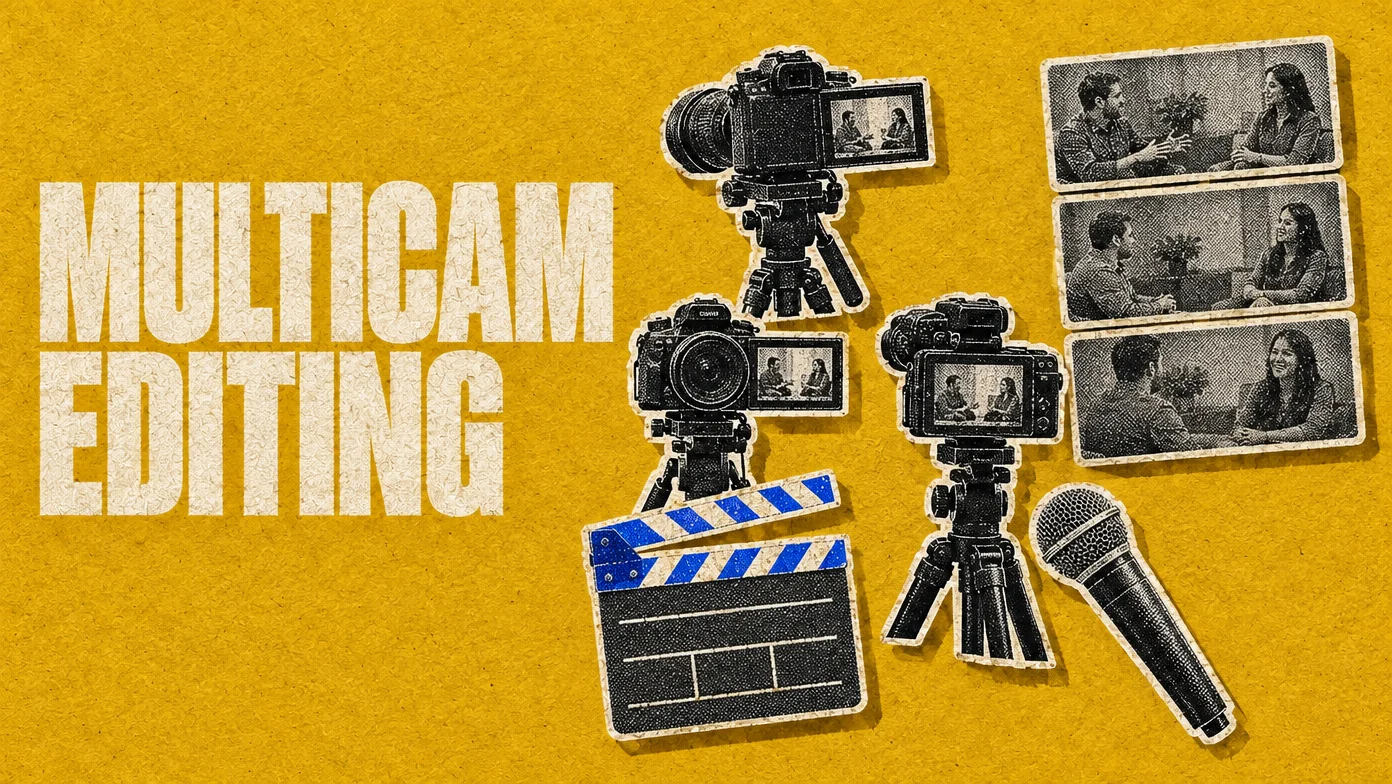
Multicam editing means syncing several recordings of the same event into one clip, then choosing which camera angle viewers see at each moment while one audio track keeps playing underneath. Every major editor follows the same order: sync the angles by shared audio, timecode or a marker; play the clip and click an angle (or press its number key) to cut to it; then move the cuts with a roll edit. You need two or more recordings of the same take, ideally plus one clean audio source such as a recorder or lavalier.
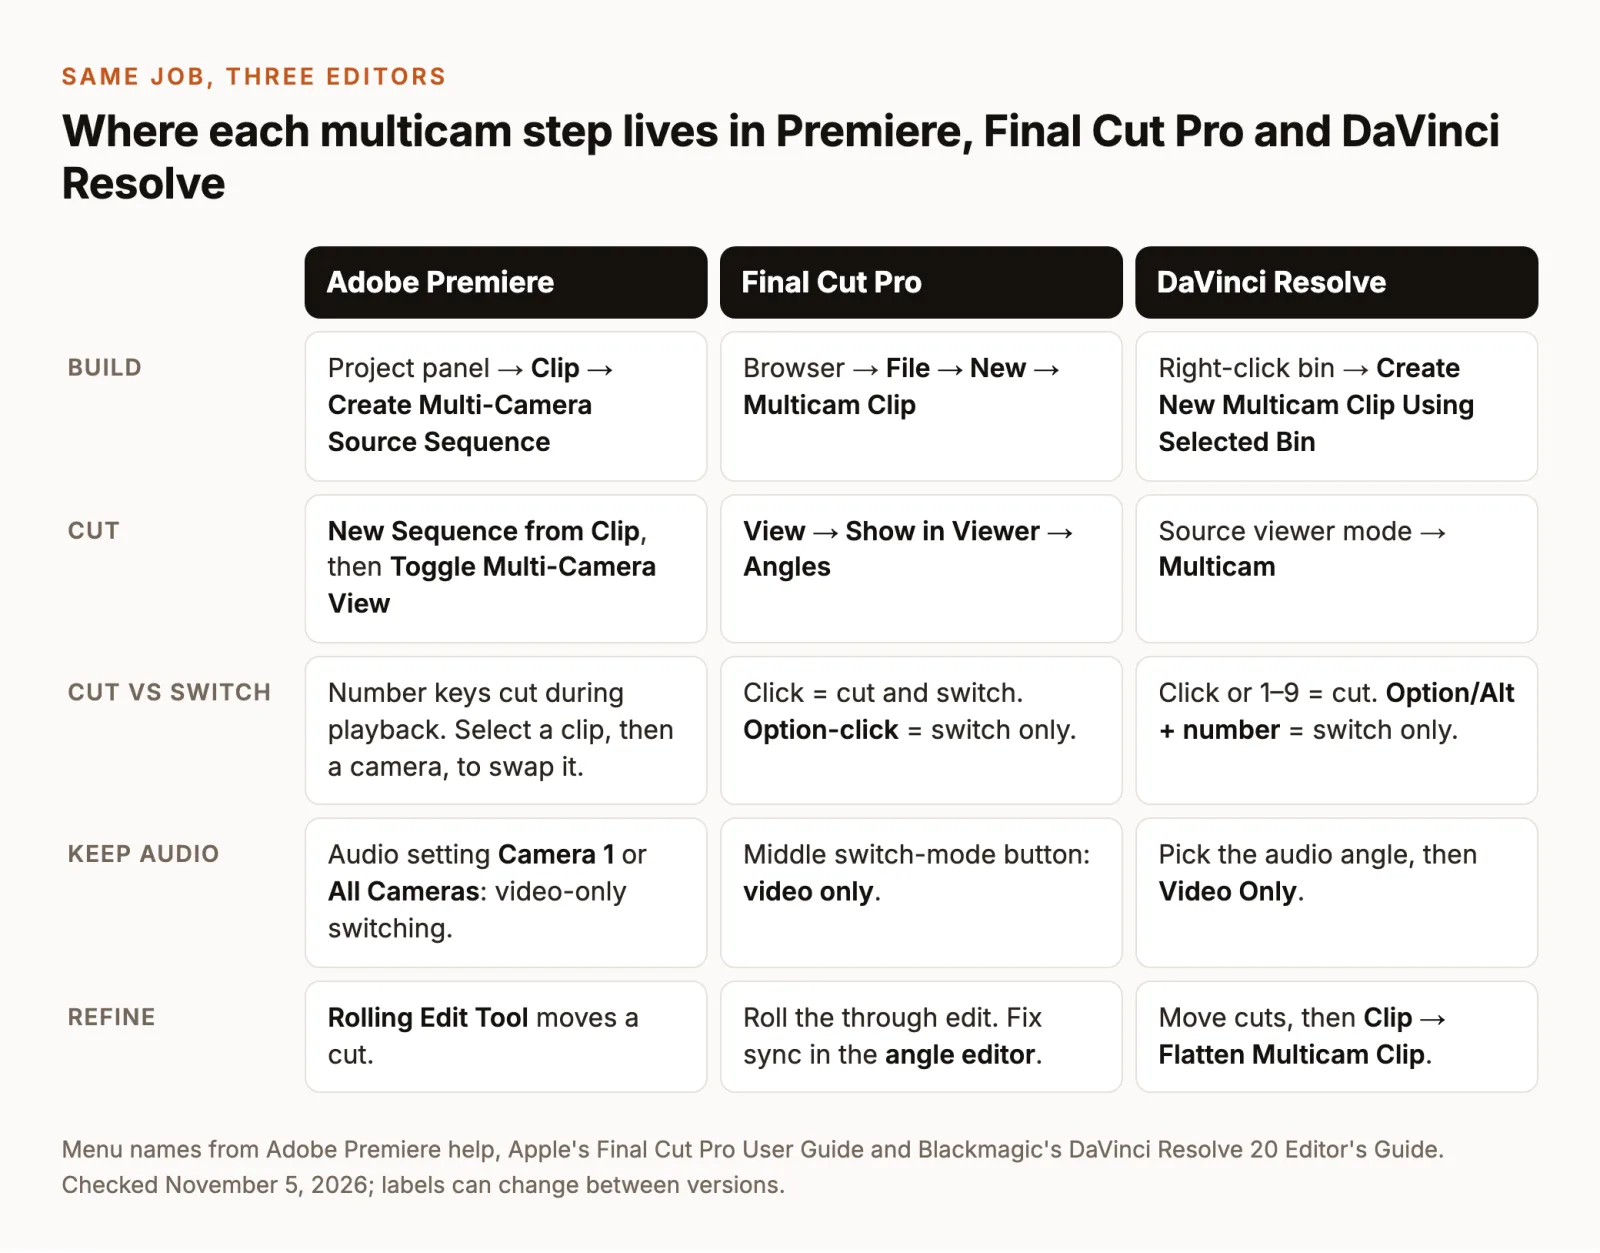
Below are the exact menu paths for Adobe Premiere, Final Cut Pro and DaVinci Resolve, taken from each company’s current documentation, then how ChatCut’s AI Multicam Editor Skill drafts the same cut from your files. One example runs through the guide: a two-person interview shot on camera A (host close-up), camera B (guest close-up) and a wide shot, with a separate audio recorder.
How multicam editing works
- Sync the angles. Match every recording to the same moment using their shared sound, matching timecode, or a marker on a clap.
- Build one multicam container. Premiere calls it a multi-camera source sequence, Final Cut Pro and Resolve call it a multicam clip.
- Choose the audio. Decide which recording the viewer hears, and set the editor to switch video only.
- Cut while you play. Watch all angles at once and click, or press a number key, to switch cameras in real time.
- Refine and review. Roll cuts to better moments, swap angles where needed, then check sync at the start, middle and end.
If you only need to line up one camera with one external recorder, that is a sync job, not a multicam edit: Premiere’s Clip → Synchronize (Adobe) and Final Cut Pro’s Synchronize Clips (Apple) handle it. Our guide to syncing audio and video walks through both, including clap alignment and drift.
Choose a sync method before you build the clip
The sync method decides how much fixing you do later, so pick it from what your recordings actually contain.
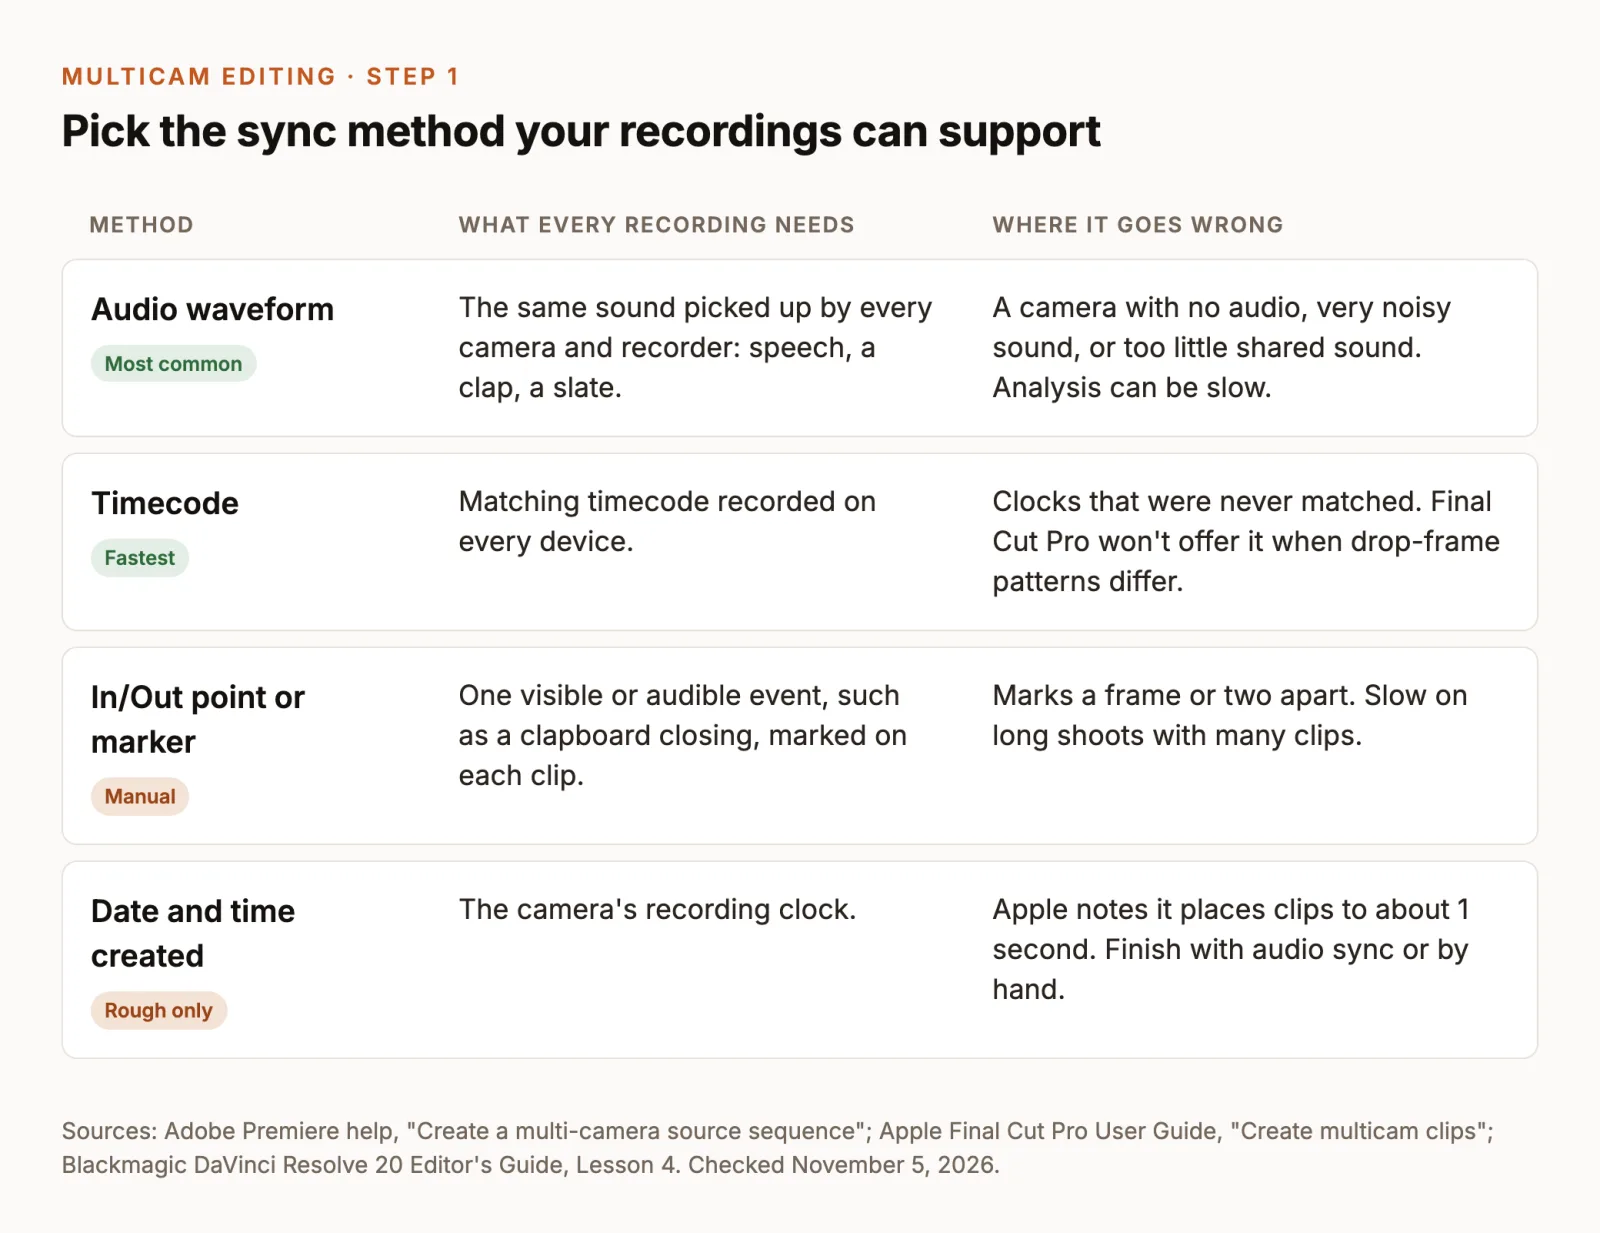
- Shared audio is the usual choice for interviews and podcasts, because every camera hears the same voices. Final Cut Pro’s documentation notes that some audio recordings are unsuitable and that analysis can take a long time (Apple).
- Timecode is the fastest and most frame-accurate method when every device recorded matching timecode, according to the same Apple page. On professional shoots that means feeding every camera from one timecode generator or jam-syncing them at the start; consumer cameras that can’t take external timecode need a visible or audible cue instead (Apple).
- A slate, clap or marker works when a camera recorded no usable sound. Mark the same frame on each clip, then sync on In points, Out points or markers.
- The camera’s date and time is not enough on its own. Apple says this method positions clips to within about one second, so finish with audio sync or by hand.
In the example interview, all three cameras recorded scratch audio, so sync by audio and use the recorder as the main sound.
Multicam editing in Premiere
These steps follow Adobe’s current help for Adobe Premiere (the app Adobe called Premiere Pro until early 2026). Premiere builds a source sequence that holds the synced angles, then a target sequence where you make the cuts.
Build the multi-camera source sequence
- Import every camera clip and the recorder file into one project.
- Select them in the Project panel and choose Clip → Create Multi-Camera Source Sequence (Adobe).
- Choose the sync point: In Points, Out Points, Timecode, Audio or Clip Marker.
- Leave Sequence Preset on Automatic unless you have a reason not to. Adobe says it follows the video format of the Camera 1 clip.
- If the recorder is consistently a few frames off, Offset Audio by shifts audio-only clips by -100 to +100 frames.
- Turn on Move Source Clips to Processed Clips bin. Clips that didn’t meet the sync criteria stay outside that bin, which shows you at a glance what failed.
- Choose the audio sequence setting (see below) and select OK.
Cut angles in the Multi-Camera view
- Right-click the source sequence in the Project panel and choose New Sequence from Clip (Adobe).
- In the Program Monitor, open the Button editor and drag Toggle Multi-Camera View onto the button bar. Click it to see all cameras at once.
- Optional: open the wrench menu and choose Overlays to number each angle.
- Press the spacebar to play. While it plays, press a number key on the main keyboard to cut to that camera.
- Stop and play back. Each camera change appears as a cut in the timeline.
- To change an angle, select that clip in the timeline and click another camera in the Program Monitor. To move a cut, use the Rolling Edit Tool.
Keep one audio source under the cuts
The audio sequence setting in step 7 decides what happens to sound when you switch cameras (Adobe):
- Camera 1 keeps only Camera 1’s audio active and switches video only. If you include audio-only clips, Adobe places them on the top tracks and unmutes them, so a recorder file stays audible.
- All Cameras unmutes all audio and also switches video only.
- Switch Audio makes the sound follow the picture, so the audio changes every time you cut. That suits a live event where each camera recorded its own feed, rarely an interview.
For the example interview, use Camera 1 with the recorder included, then listen across a few cuts to confirm the recorder is the track you hear.
Final Cut Pro multicam editing
Final Cut Pro (FCPX) keeps the synced angles inside a multicam clip in the browser. You cut it in a project timeline with the angle viewer, and fix its sync in the angle editor.
Create the multicam clip
- In the browser, select the camera clips and the recorder clip.
- Choose File → New → Multicam Clip, or Control-click the selection and choose New Multicam Clip (Apple).
- Name the clip and choose its event.
- Select Use audio for synchronization when the angles share usable sound.
- For more control, click Use Custom Settings. Angle Assembly groups clips into angles (for example by Camera Name), and Angle Synchronization offers Timecode, Content Created, Start of First Clip and First Marker on the Angle.
- Click OK.
Apple’s tip for difficult audio: put a marker roughly on the clap in each angle, choose First Marker on the Angle, and keep audio sync on. The marker only has to be close; the audio analysis finishes the job.
Cut and switch in the angle viewer
- Add the multicam clip to a project timeline. The cut and switch feature works on timeline clips only (Apple).
- Choose View → Show in Viewer → Angles (Shift-Command-7).
- Click the middle switch mode button at the top left of the angle viewer to switch video only. The audio from the original angle stays active. Blue highlighting marks the active video angle, green the active audio angle.
- Play the project and click an angle, or press its number key, to cut and switch at the playhead.
- Option-click (or Option plus a number) to switch the angle of the current section without adding a cut.
The angle viewer shows banks of 2, 4, 9 or 16 angles; choose the bank size from its Settings pop-up menu.
Fix sync in the angle editor
If an angle drifts out of sync, double-click the multicam clip in the browser to open the angle editor. Set the angle you trust as the monitoring angle, then choose Sync Angle to Monitoring Angle from the out-of-sync angle’s pop-up menu to align it by its audio, or drag it by hand to a shared clap (Apple). Apple recommends duplicating the clip in the browser first to keep a clean copy, because changes to the parent clip affect every instance in your projects.
Change angles after the first pass
Control-click a multicam clip in the timeline and choose Active Video Angle or Active Audio Angle to swap it, or set either for several selected clips in the Info inspector (Apple). Cuts appear as dotted through edits; dragging one performs a roll edit. Apple lists one catch: video and audio effects, keyframes (including volume) and role assignments belong to a specific angle and don’t carry over when you switch angles. Grade and mix after you settle the angles.
DaVinci Resolve multicam editing
These steps follow Blackmagic’s DaVinci Resolve 20 Editor’s Guide, Lesson 4 (Blackmagic, PDF). Resolve builds a multicam clip from a bin and cuts it in the source viewer’s Multicam mode.
Create a multicam clip from a bin
- Put every angle and the recorder file for one session into a single bin.
- Right-click the bin and choose Create New Multicam Clip Using Selected Bin.
- Name the clip and check that Frame Rate matches your footage.
- Set Angle Sync to Sound. Without matching audio, sync on In or Out points, timecode or markers instead.
- Leave Channel on Automatic, or pick the cleanest channel.
- Set Multicam Audio. Source Audio Channels keeps each angle’s sound; Reference Audio/Angle 1 uses the audio-only clip (or the first angle’s audio) for every angle, which simplifies an interview edit.
- Set Angle Name (for example Clip Name) to control the angle order, then create the clip.
Cut in the Multicam viewer
- Edit the multicam clip into a timeline.
- In the source viewer mode menu, choose Multicam. All angles play in sync with the timeline; a blue outline marks the active video angle and a green outline the active audio angle.
- Below the viewer, click Video Only so cuts change the picture and leave the audio alone.
- Play and click angles to cut, or press 1 to 9 on the top row of the keyboard.
- Hold Option (macOS) or Alt (Windows) with a number key to switch the angle at the playhead without adding a cut.
Flatten when you’re finished
Clip → Flatten Multicam Clip turns the multicam clips into ordinary clips, so each angle can be graded on its own in the Color page. After flattening you can no longer switch angles, so Blackmagic suggests duplicating the timeline first.
Resolve Studio’s AI Multicam SmartSwitch
DaVinci Resolve Studio 20 adds AI Multicam SmartSwitch, which analyzes the angles, including lip movement, and cuts to the active speaker as a rough cut. Blackmagic marks it Studio only (compare editions on the DaVinci Resolve Studio page) and recommends it for talking-head edits where each speaker has a camera. It opens from an icon in the multicam viewer and offers settings for cut frequency, use of wide shots and whether to cut video only.
AI multicam editing in ChatCut
ChatCut handles the two halves of the job separately: a built-in command that only syncs, and a Skill that syncs and then drafts the cut.
Sync only: AI multicam sync
In My Assets, select at least two recordings of the same take, right-click one and choose AI multicam sync. ChatCut places them at the playhead on separate tracks and aligns them by their overlapping audio. It doesn’t cut between angles, and if it can’t find a confident match it leaves the clips where they were (Timeline docs). The sync guide linked above walks through this command step by step.
Sync and cut: the AI Multicam Editor Skill
The AI Multicam Editor Skill does what you did by hand in the sections above. You give it the camera and audio files from one session, and it:
- works out from their audio and transcripts which files are separate angles and which are recorders;
- aligns everything on its own master timeline, without time-stretching anything to hide drift;
- picks the clean recorder as the program audio and mutes the cameras’ own sound;
- builds a second, editable timeline that follows the conversation, cutting to the speaker and to wider shots or reactions where they help;
- reports uncertain matches instead of guessing, and stops after the master if you ask for sync only.
The result is made of ordinary clips on ordinary tracks, not a locked multicam container, so you change an angle the same way you’d change any clip. Paste this in the Agent with your own files referenced with @:
Check: play the first and last minute of the cut and watch lips against the voice. Then scrub the master timeline: if a camera stopped and restarted, confirm each piece landed in the right place.
Agent and Skill runs use ChatCut credits even though they only edit your own footage (Plans and credits). Once the angles are right, the Speech Cleanup Skill can take out retakes and long pauses, and our talking-head video guide covers captions, B-roll and pacing.
To finish in another editor, Export → XML hands the timeline to Premiere or DaVinci Resolve as ordinary clips for relinking; it is not a native multicam clip, and ChatCut doesn’t export FCPXML for Final Cut Pro (XML export).
Review the cut before you export
Whichever editor you used, run the same checks:
- Lip sync at three points. Watch the beginning, the middle and the end. One offset that is right at the start and wrong at the end points to drift, which a multicam re-sync won’t fix; see fixing drift.
- Sound across picture cuts. If the voice level or room tone jumps when the picture changes, your editor is switching audio too. Go back to video-only switching.
- Cuts on a thought, not a timer. Move cuts to a breath, a look or the end of a sentence with a roll edit. A short interjection rarely needs its own shot.
- Honest reactions. A reaction shot should come from the same moment in the recording, not from elsewhere in the session.
- The exported file. Play the actual export, not the timeline, including the first and last spoken lines.
ChatCut Desktop renders locally with presets up to 4K; cloud export is limited to 1080p (Desktop local export). The desktop app runs on macOS 13 or later (Apple silicon or Intel) and Windows 10 or later (x64).